Duration: 3 hours
Participants: Kim Bjerge, María Soler, José Antonio Esparza
Goals of the lab session.
Use the lejos facilities to implement navigation and localization in a simple lego robot.
Implement a tacho-based navigation robot.
Discuss how to avoid objects while making using navigation to reach a concrete target.
Discuss different improvements on navigation.
Navigation
Terrain
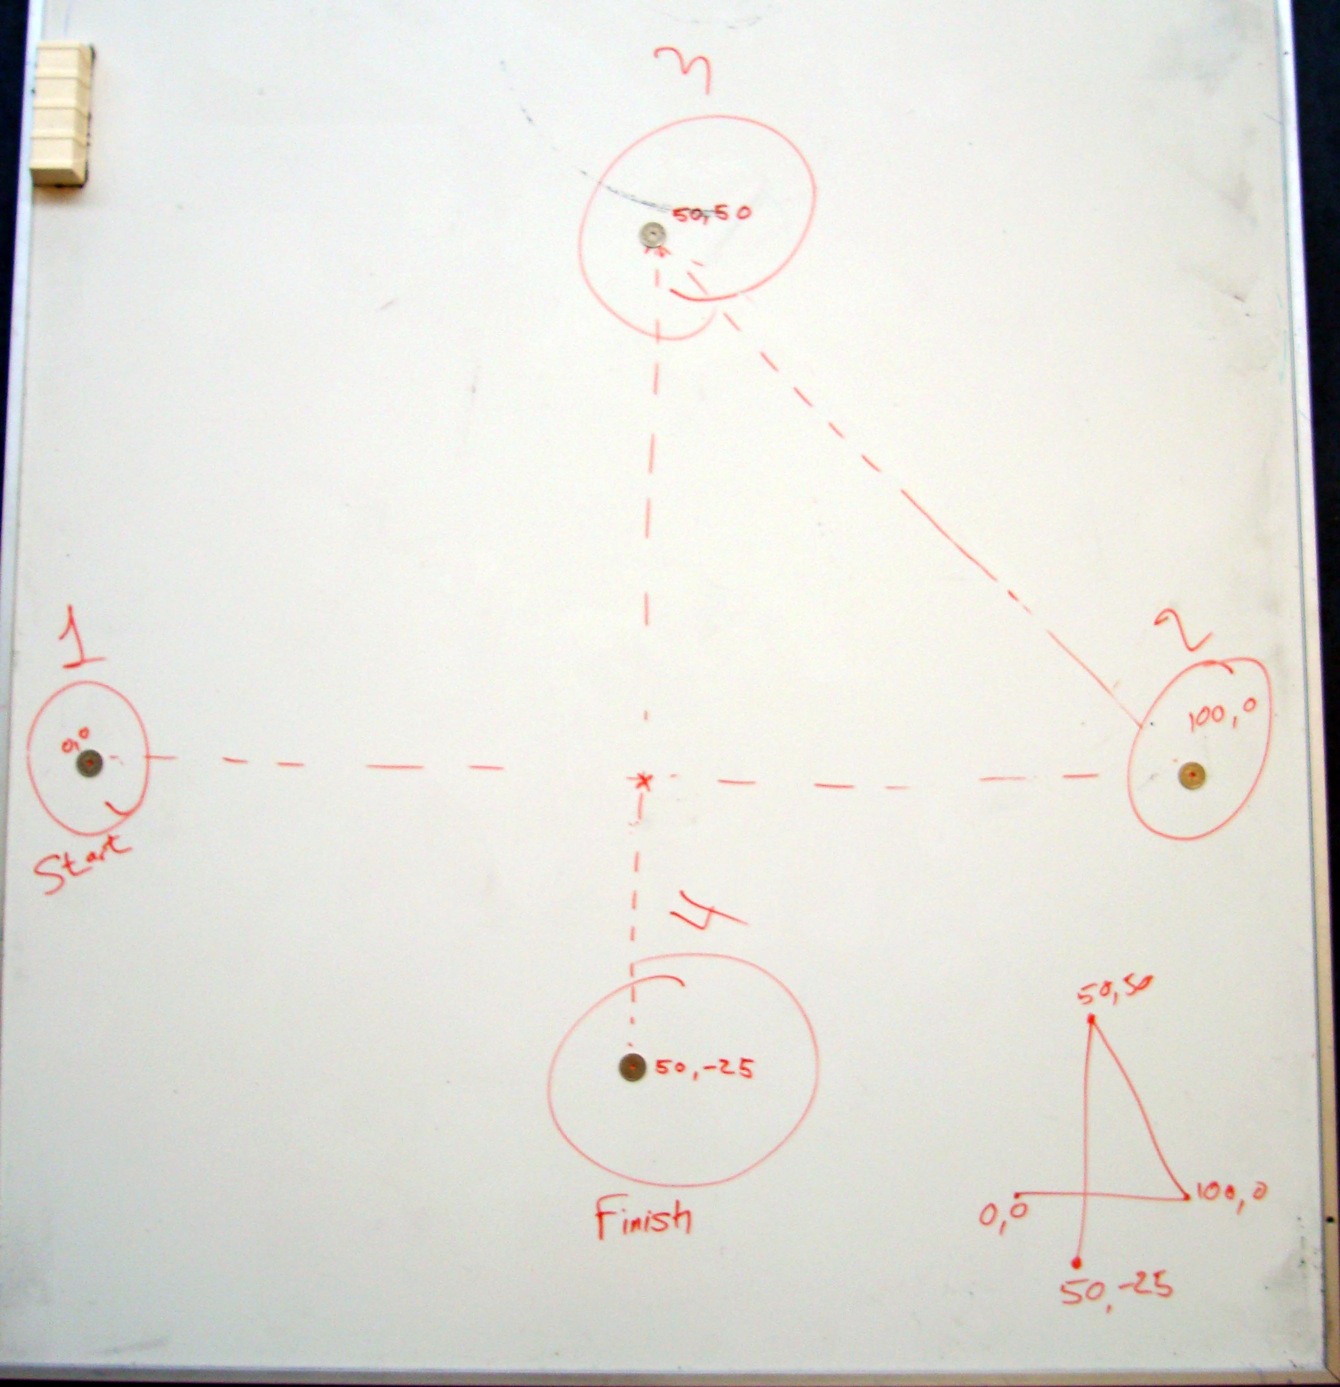
In Brian Bagnall [1], a scenario like the one showed below is introduced. Since the experiments conducted in this section were based on it, we decided to draw it in a whiteboard.

We scaled the distances by 50%, so it was possible to draw them in a whiteboard. The final terrain can be seen in the figure below.
Mechanical considerations
We tried the navigation algorithm with two different robot configurations. In the first one we were using thin and big wheels, with a diameter of 81,6 mm and a width of 15 mm. In the second configuration we used 56 mm diameter wheels with and 26 mm width. The accuracy on the robot movements was better with the smaller wheels.

In the case of the 81,6 mm wheels, for each turn the wheel is performing the robot has traveled a distance of 257 mm. With the 56 mm wheels, the robot traveled a distance of 176.4 mm. The tacho counter accuracy is the same, so the conclusion that can be extracted is:
First configuration: 360 readings within a distance of 257 mm -> 1.4 tacho-counts per mm.
Second configuration: 360 readings within a distance of 176.4 mm -> 2.04 tacho-counts per mm.
At first sight, this seems to be not so significant but, if it is considered that the robot is traveling distances within the range of meters we can contextualize this information:
Considering 1 m displacement:
1400 tacho-counts with configuration 1 (big wheels)
2040 tacho-counts with configuration 2 (small wheels)
There is a clear improvement of 640 tacho-counts, that allows the robot to be more precise while moving.
After doing these calculations we decided to keep using the small 56 mm wheels in our robot configuration.
Software considerations
The TachoPilot from the Lejos API has been used to program the navigating robot. See code snippet below. Travel and rotate is used to moved the robot car in a predictable route described above.
public class TachoPilotTester
{
static TachoPilot robot = new TachoPilot(56f,112f,Motor.B, Motor.C,true);
public static void main(String[] args ) throws Exception
{
LCD.drawString("Test Pilot ", 0, 0);
Button.ENTER.waitForPressAndRelease();
robot.setSpeed(300);
robot.travel(-1000, true);
if (WaitMoving(1)) return;
robot.rotate(-135, true); // Way point 1
if (WaitMoving(5)) return;
robot.travel(-710, true);
if (WaitMoving(2)) return;
robot.rotate(-135, true); // Way point 2
if (WaitMoving(5)) return;
robot.travel(-750, true);
if (WaitMoving(3)) return;
// Moving backward the track
robot.rotate(-180, true); // Way point 3
if (WaitMoving(4)) return;
robot.travel(-750, true);
if (WaitMoving(4)) return;
robot.rotate(135, true); // Way point 2
if (WaitMoving(4)) return;
robot.travel(-710, true);
if (WaitMoving(4)) return;
robot.rotate(135, true); // Way point 1
if (WaitMoving(4)) return;
robot.travel(-1000, true);
if (WaitMoving(4)) return;
robot.stop(); // Home
Final results
The robot behaviour can be seen in the following video http://www.youtube.com/watch?v=gAFi1-ibWrUPossible improvements
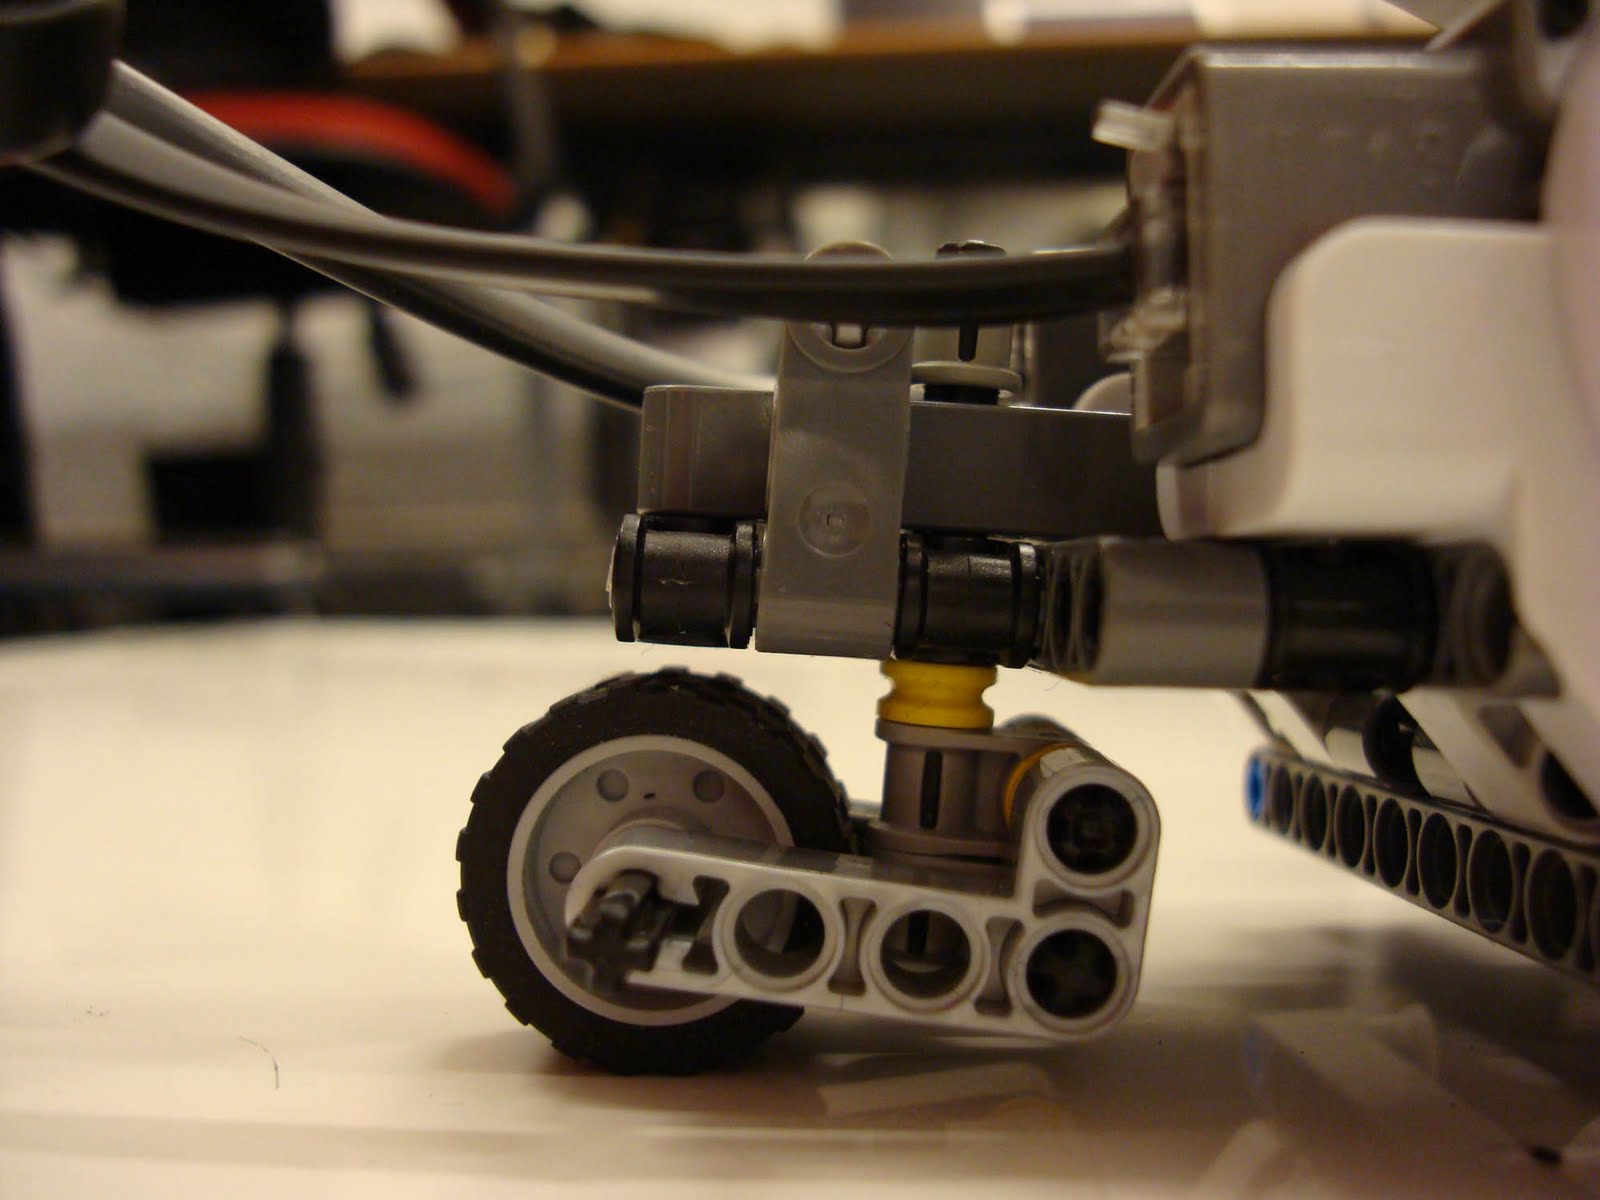
The free wheel mounted on the back of the robot was clearly altering the movements the robot was performing. This situation appeared after the robot performed a turn. When the robot is moving along a straight line, the free wheel is positioned as it is shown in the picture on the left. In the case the robot is going to turn to the left, it will stop moving forward, and turn the servos in opposite directions until it is properly orientated. After this maneuver, the free wheel will end up in the position shown on the right. It is in that situation when the wheel position is going to offer some resistance to the initial movement, altering the proper orientation a few degrees.

The problem in this kind of navigation resides in the fact that, even the introduced deviation is very small, the errors will keep accumulating along the path, making the final deviation considerable.
Navigation while avoiding objects
The approach that we suggest to create an object avoiding robot that is able to navigate is based on a subsumption architecture. This architecture will be composed by two different behaviours, implemented in two separated threads. These threads will be the following:
Thread 1: Navigation behaviour. It will be the lowest priority thread, responsible for making the robot go through the different waypoints that compose the route.
Thread 2: Avoiding behaviour. It will be the highest priority thread, responsible for avoiding an object in front of the robot that is obstructing the path.
As explained in [3], if the conditions for triggering the highest priority thread are not met, the default behaviour will be executed, in this case the navigation behaviour.
An important issue is the context switch between the navigation and the avoiding thread. The key values are the static fields that register the tacho readings. How to handle those values is illustrated in the following diagram.
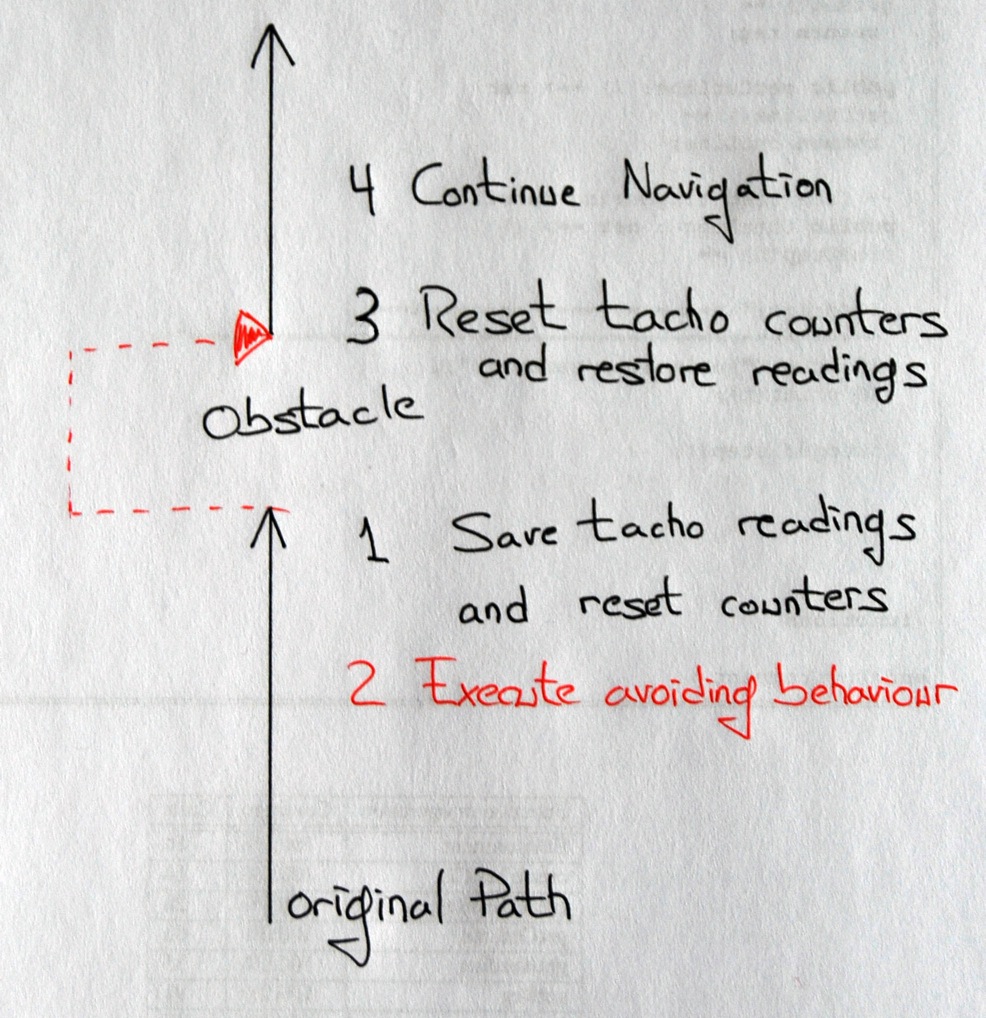
The black arrow represent the original path, that is followed in the navigation. At some point, the robot finds an obstacle that has to be avoided. Then, as shown in the first step, the tacho readings are saved and the counters are reseted. The avoiding behaviour is executed, and it will make the robot travel through an specific avoiding path, predefined in that task. Since the avoiding path is defined in the task, the distance it is traveling is fixed and known by the controller. Once the robot has avoided the obstacle, the task responsible for the navigation is run again. The first action after the context switch is to reset the tacho readings and increment them with the straight distance that has been traveled, excluding the lateral displacements. At that point the robot should be able to continue the navigation.
This strategy is not taking in consideration what will happen if the robot finds a second obstacle when it is already avoiding one. A problematic issue will be as well to find an obstacle if the robot is making a turn. In that case, the avoiding behaviour could be executed as previously defined but, the calculations after the context switch to the navigation task will involved some additional geometry. Both issues have not been considered in this preliminary approach.
The navigator class
Instead of using the TachoPilot class from the Lejos API we have also decided to explore the functionality of the SimpleNavigator class that is very similar to what is described in [2]. The simple navigator keeps track on the position based on tacho pulses from the left and right wheels. It uses the TachoPilot class to handle movements in coordinates (x,y).
The simple test program below moves the robot car in a square.
public class NavigatorTest
{
static TachoPilot pilot = new TachoPilot(56f,112f,Motor.B, Motor.C,false);
static SimpleNavigator robot;
public static void main(String[] args ) throws Exception
{
robot = new SimpleNavigator(pilot);
LCD.drawString("Navigator Tester ", 0, 0);
Button.ENTER.waitForPressAndRelease();
robot.setMoveSpeed(300);
robot.setTurnSpeed(200);
for (int i = 0; i <>
{
robot.goTo(500, 0, true); // x=500,y=0
if (WaitMoving()) return;
showCount(1);
robot.goTo(500, 500, true); // x=500, y=500
if (WaitMoving()) return;
showCount(2);
robot.goTo(0, 500, true);
if (WaitMoving()) return;
showCount(3);
robot.goTo(0, 0, true);
if (WaitMoving()) return;
showCount(4);
}
robot.stop();
The positioning seems promising see below video. It turns out that the red marker has a big impact on the quality of the movements. Removing the marker of the robot nearly moved the car in a perfect square.
The robot using the navigator class without the red marker attached to it. video.
The robot using the navigator class with the red marker attached to it. video.
Complete code to be found here (lab9_1 and lab9_2):
http://code.google.com/p/josemariakim/source/browse/#svn/trunk
References
[1], Brian Bagnall, Maximum Lego NXTBuilding Robots with Java Brains, Chapter 12, Localization, p.297 - p.298.[2] Java Robotics Tutori, Enabling Your Robot to Keep Track of its Position and Programming Your Robot to Navigate.
[3] The subsumption architecture. - Article on wikipedia http://en.wikipedia.org/wiki/Subsumption_architecture
Ingen kommentarer:
Send en kommentar